Mounts for Helium Antennas
Mounting Options for Helium Antennas:
Being able to optimally locate your Helium antenna means that you can maximize the revenue that your miner can generate. Data Alliance provides an extensive selection of high-quality and secure mounting options for Helium antennasthat are able to facilitate a wide range of mounting arrangements for an outdoor-located external Helium antenna.
These mounting options are designed to work with the N-type connector that is commonly used in outdoor Helium antennas and miners. These bolts and brackets support the secure connection of an N connector antenna to an N connector antenna cable.
Brackets and mounts for Helium antennas
Here are the key types of antenna bracketry available for use with Helium Network antennas:
[A] U-Bolts are common mounting equipment for antennas that need to achieve good elevation like omnidirectional antennas like collinear array antennas. U-bolts are cost-effective and simple to install, allowing an N connector antenna to be robustly pole mounted. This type of Helium antenna mount is made up of two “U-shaped” threaded bolts and corresponding pairs of hex nuts. U-bolts require support like a pole or another mount to work off. The pole or masts that are used sits within the u-bolts that can then be connected to an antenna bracket for mounting the antenna. As the hex nuts are tightened down on the thread of the U-bolts the grip of the u-bolts on the pole increases. These bolts can be purchased with L-shaped mounts and J-mounts.
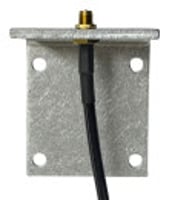
[B] L mounts are “L” shaped heavy-duty, wall-mounted brackets that are made with a right angle to support an antenna offset from the wall. The brackets are made from stainless steel or other strong non-staining alloys and can be attached to a wall with masonry plugs and screws. These brackets provide simple elevated mounting making them a great choice for low-profile outdoor antennas.
The antenna connector sits within the hole on the surface of the bracket that is perpendicular to the wall. The L-mount must be matched to the type of antenna connector present (either N-type or RP-SMA). The antenna is placed with its connector passing through the hole and the connecting cable can be attached from beneath. They can also be used with bulkhead antenna connectors or adapted for use with u-bolts.
[C] U-Bolt Swivel Antenna Pole Mount Bracket are special mounts that are designed to be used with both masts (via U-bolts) and direct surface mounting. Their articulated design provides a range of adjustable mounting options with a strong mounting platform. The Data Alliance corrosion-resistant swivel mount bracket is caple of holding a mast with a diameter of up to 1.75 inches. Due to its swivel design, the mast can bolt onto a variety of angled surfaces including roofs, attics, and chimneys.
Correct Helium antenna mounting can improve the performance of a Helium miner
The LoRa signals received by a Helium miner may have traveled over a long distance and are low-energy. Antenna visibility is therefore essential, with the correct mounting of an external antenna critical to deriving the expected level of performance.
Poor installation techniques and low-quality or inappropriate mounting hardware will lead to the functioning of the installed antenna being diminished and shortening of its lifespan. Poor mounting can also lead to an antenna becoming a safety hazard.
Considerations for locating a Helium antenna for installation
Helium antenna location is one of the biggest contributors to the profitability of a Helium miner. Line of sight visibility of a Helium antenna is the gold standard. This is commonly achieved by mounting the antenna at height, keeping it clear from obstructions that would be capable of attenuating the LoRa signal or causing signal reflections and interference. In metropolitan environments, this is not always achievable but where possible take care to avoid environmental features like:
- Bodies of water
- Hills
- Buildings
- Vegetation
In addition to topography, the density of nearby Helium miners also has to be considered. The Proof of Coverage (PoC) protocols for Helium miners specify a distance of at least 300 meters between Helium hotspots, which may be difficult in urban areas.
Walls and windows can block the signal, but depending on the mounting options available, outdoor external Helium antenna placement will always be more effective than indoor location.
Cable runs from the antenna installation should always be kept as short as possible.
Mounting techniques for outdoor Helium antennas
Wall-mounting your Helium antenna
L-mounts and other brackets are sued to secure a Helium antenna to a wall. Care should be taken to avoid any overhang of the roof or guttering. Multiple brackets and spacing can be used to increase the strength of your installation. For outside walls, you will need to use wall anchors, masonry plugs, sleeve anchors, or shield anchors that are capable of providing the necessary hold on the brickwork. Mounts should always be screwed into the brick and not the mortar.
Mounting a Helium antenna on the roof
A swivel mount can be used to secure a pole-mounted antenna to a pitched roof. Masts and poles that are set up on a roof will need to be additionally secured with guy wires. Addition roof mounting options can be found here.
Attaching a Helium antenna to a chimney
Chimneys can assist in providing the height that a Helium antenna needs, but due to high winds that can damage aging chimneys there are risks involved. Firstly, you must ensure that a chimney is in good condition and capable of bearing the weight of the antenna you intend to install. If the chimney is working the antenna must be clear of smoke and fumes that may damage it. The mounting height should not exceed 10 feet (3 meters) and the antenna pole will need to be suitably guyed and lashed to the chimney.
Safety considerations for mounting Helium antennas
If you have any doubt in your ability to competently install your Helium antenna, it is best to arrange mounting by a professional installer.
Mounting a Helium antenna exposes you to the risks of working at height and electrocutions. You must remain aware of your safety at all times when undertaking the installation of an antenna. Remember the following points:
- Do not attempt to install an outdoor Helium antenna or correct mounting issues on wet, windy, or stormy days.
- No matter how tempting the location is, an antenna should never be installed near overhead power lines. It is easy to mistake power lines for guy wires or telephone lines, therefore it is best to exercise caution with all overhead lines.
- Wear rubber-soled shoes and gloves and long-sleeved clothing when mounting an antenna.
- Do not use a metal ladder to mount your Helium antenna.

