


NMO Cables & Adapters | MABO
|
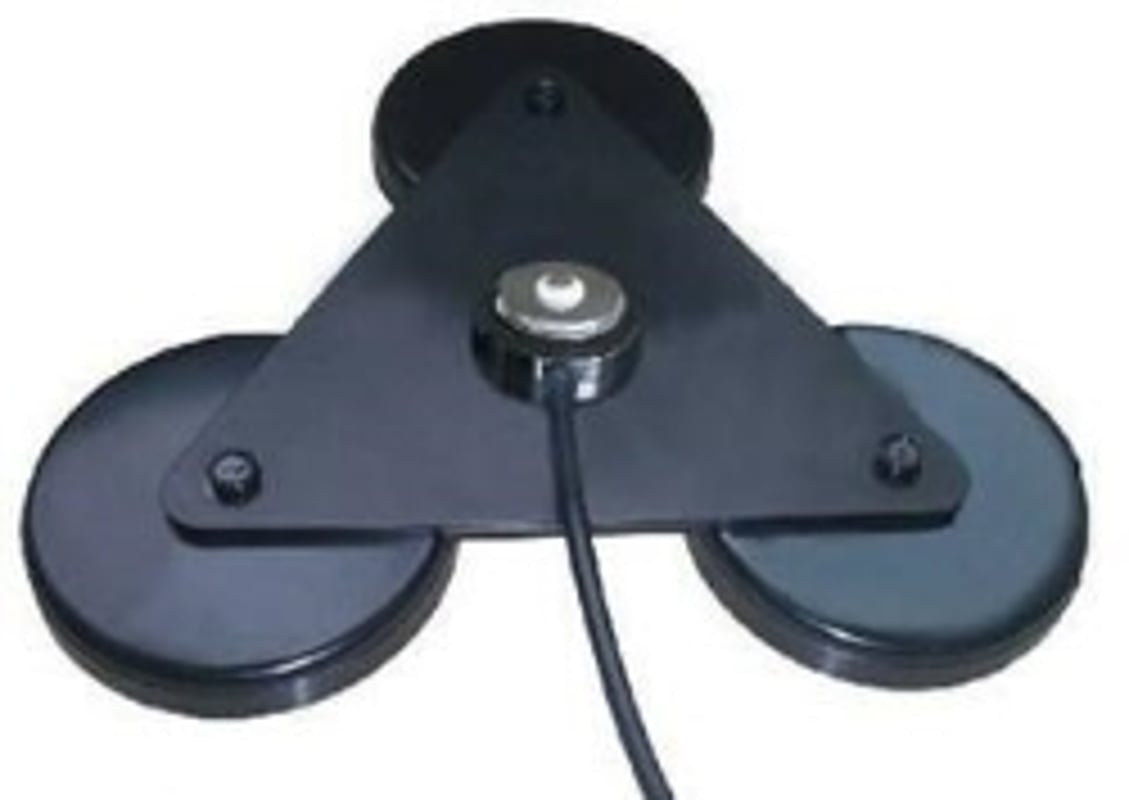
NMO triple magnetic mount. Cable and connector can be customized for large orders. NMO fitting fits the base of the NMO antenna. |
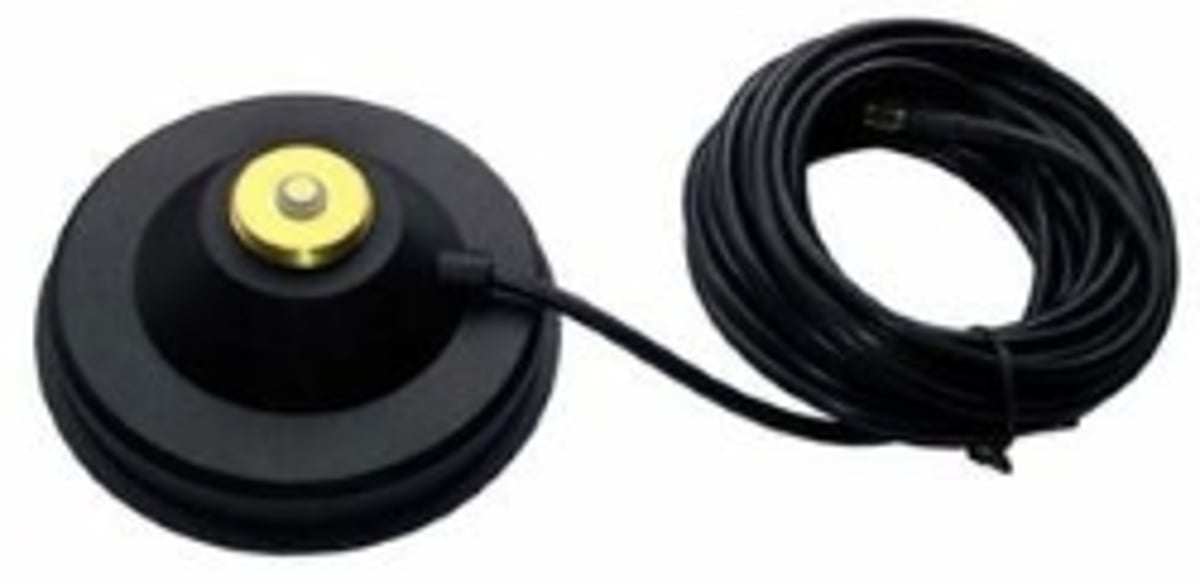
Magnetic mount with 90mm diameter (3.12 inches). Cable and connector can be customized for large orders. NMO fitting fits the base of the NMO antenna. |
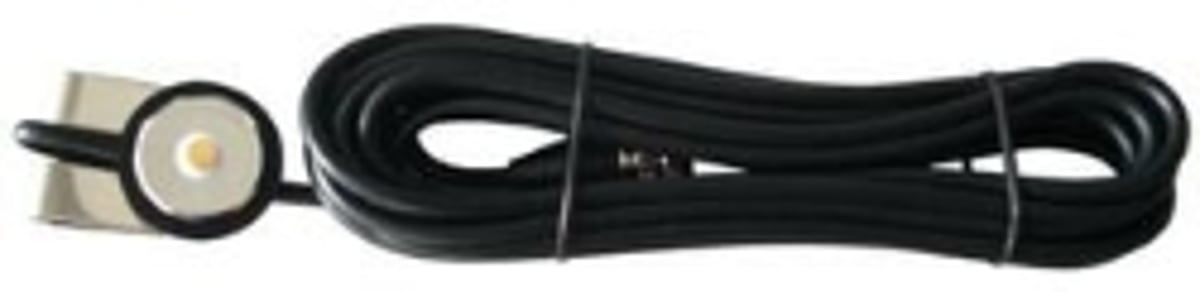
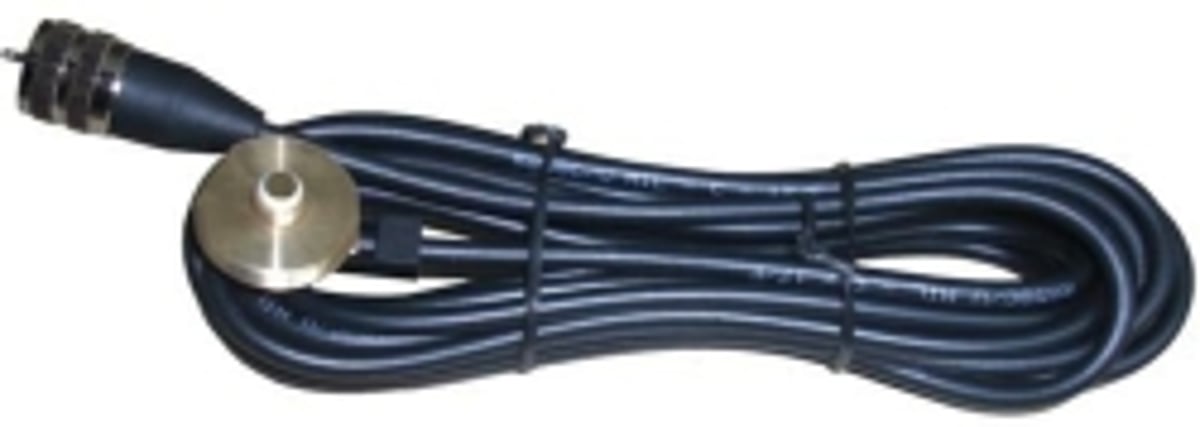
Trunk mount with 6ft cable to SMA. Cable and connector can be customized. NMO fitting fits the base of the NMO antenna. |
|
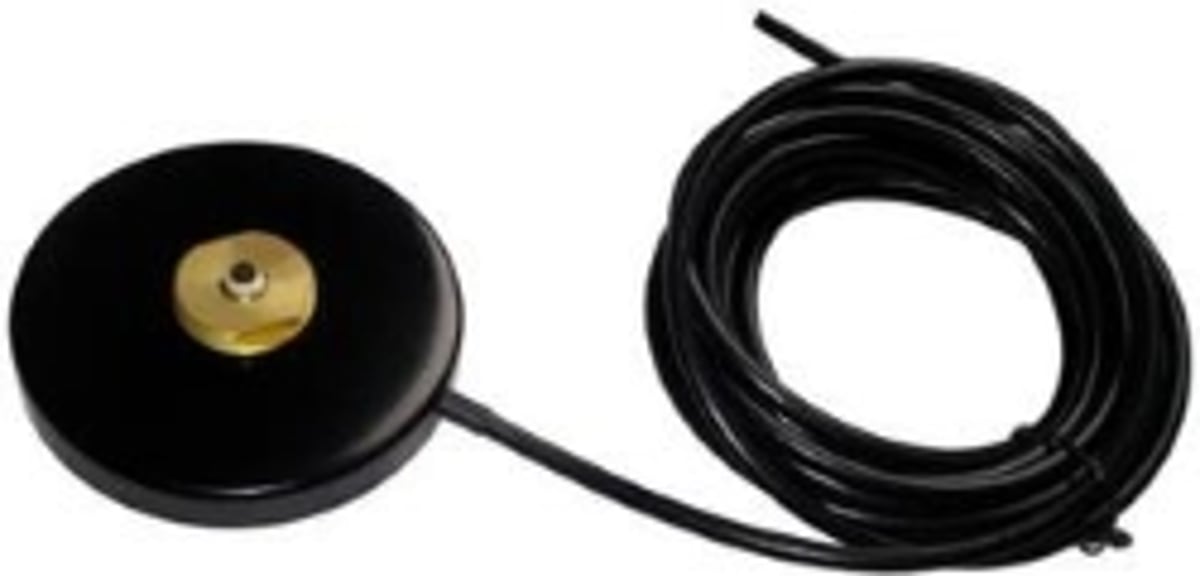
Magnetic mount with 58mm diameter (2.54 inches). Cable and connector can be customized. NMO fitting fits the base of the NMO antenna. |
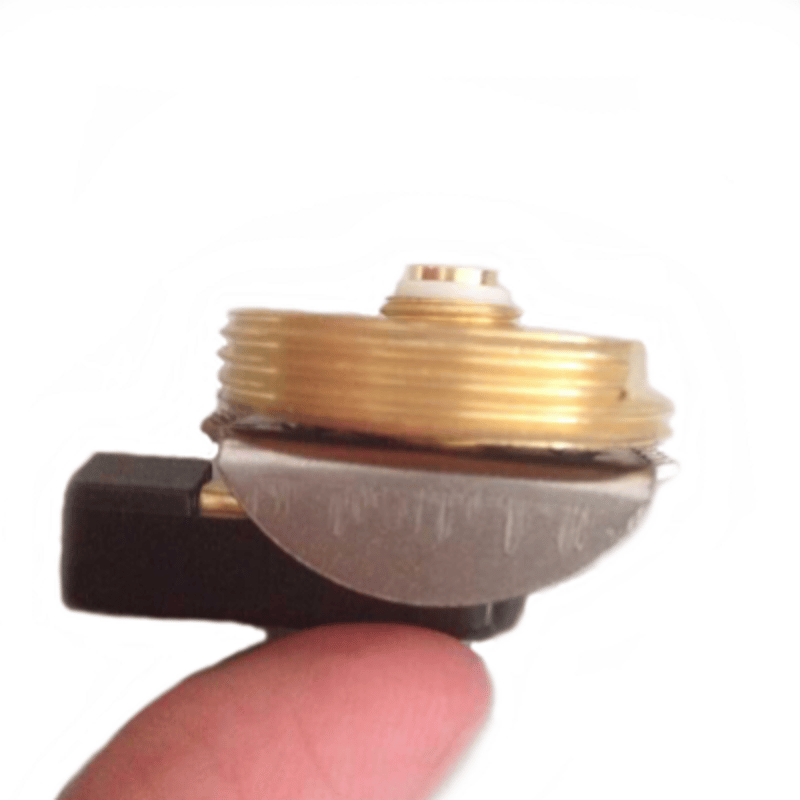
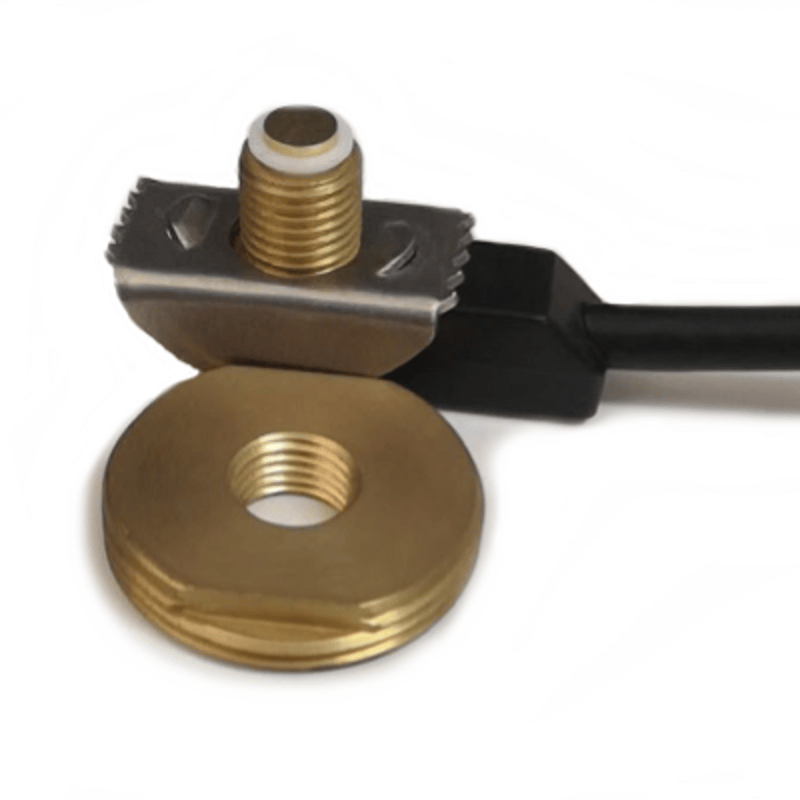
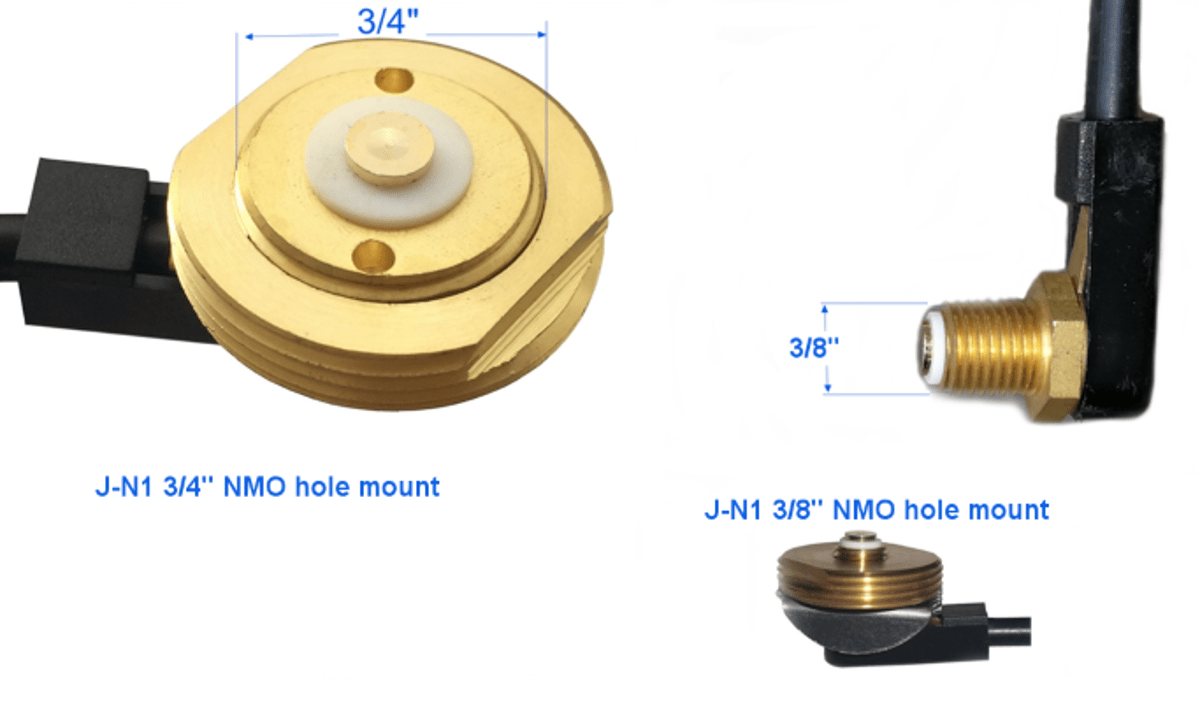
L mounting bracket with options for 0.75-inch NMO and 0.375-inch NMO. NMO fitting fits the hole of this mount. |
NMO through-hole mount: Cable and connector can be customized for large orders. NMO fitting fits the base of NMO antennas. |
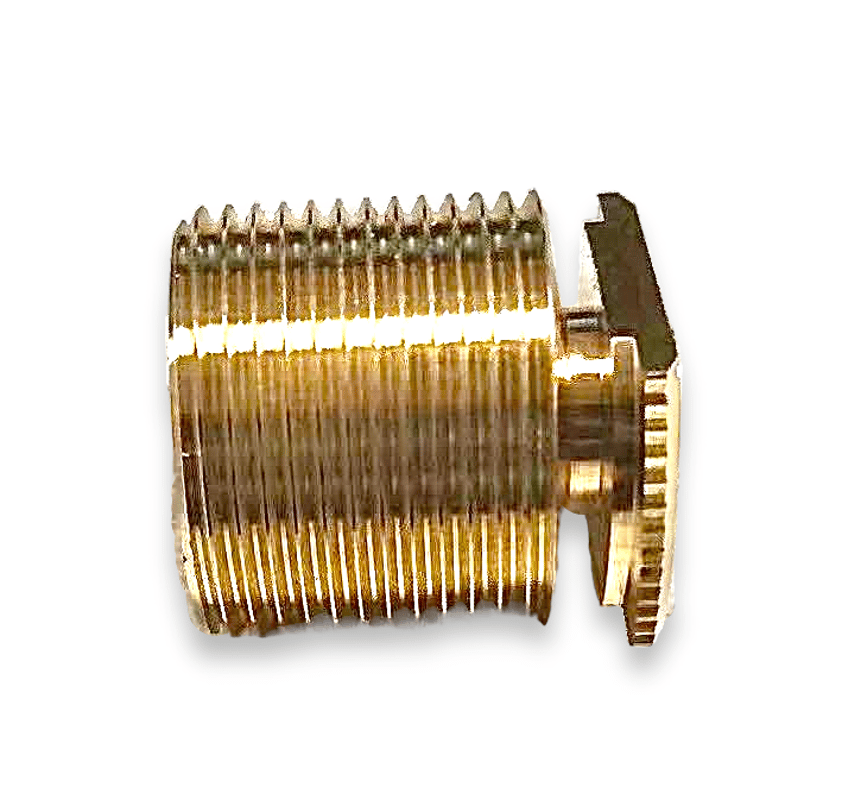
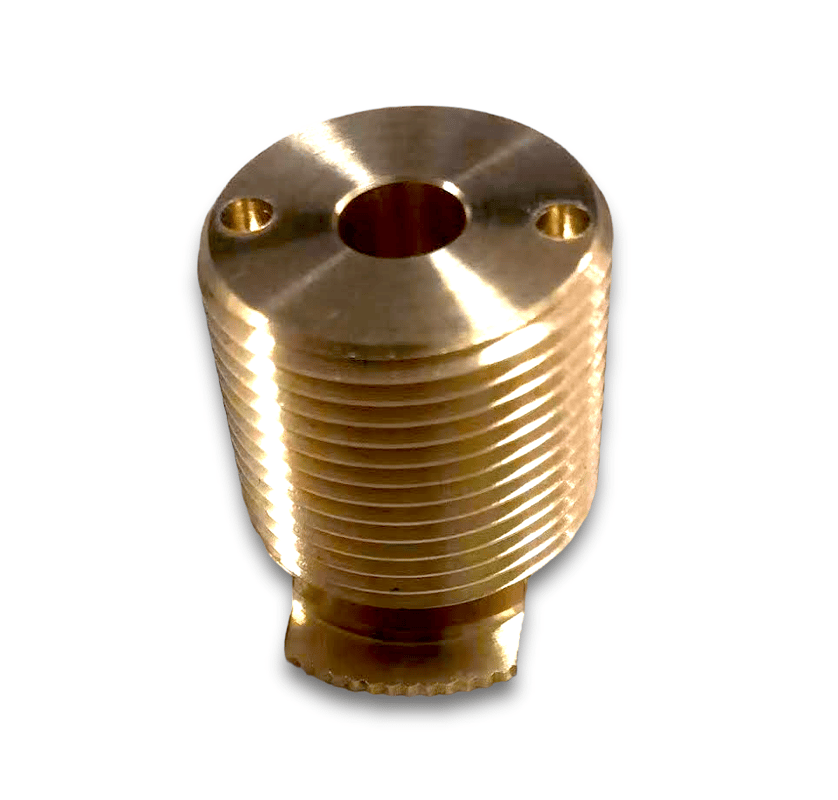
NMO Antenna Mounts for Vehicles: Through-Hole Type
 Data Alliance provides:
- NMO antenna mounts with cables to SMA
- Cable-length options and connector options: Stock items and customizable for large orders.
- NMO-mount-compatible antennas
- LTE antennas including Multiband LTE
- WiFi & Bluetooth NMO-mount compatible antennas
- 900MHz antennas for LoRaWAN, Helium & any application in the 890-915 MHz frequency band
 Key Points:
- NMO ring hole size: There is a 3/8" version and a 3/4" version.
- MABO works with a ⅜ inch hole
- MBO works with a ¾ inch hole.
- MABO and MBO are two different types of through-hole NMO connector. They were prototypes to work with a specific diameter of hole. They were originally developed by Laird and are now used to identify the diameter of hole a particular NMO mount needs.
- NMO is a thru-hole mount type that is optimized for vehicular roof mounting of an NMO type antenna.
NMO stands for "New Motorola Mount", an extremely popular antenna mount that securely hold mobile antennas on vehicles. As the name suggests, the New Motorola mount was created by the Motorola company in the 1960s for the attachment of whip mobile antennas.
They are a simple design that proves a standard threaded connector that a variety of compatible antennas can be screwed onto. As long as the antenna has an NMO base, it will be suitable. This practical design was devised to include the antenna cable and connector; the antenna simply connects directly to the mount. One of the things that makes the NMO mount popular, is that the antenna is not permanently connected to the mount, you can switch the antenna as many times as you require. Base-loaded whip antennas mounted on an NMO mount tend to be low-profile. An NMO mount only takes up 1/4" height above the mounting surface.
NMO antennas mounts are available in one of two main installation types, thru-hole or magnetic. Thru-hole mounts require a hole to be drilled in the vehicle it is being mounted on, while magnetic mounts use a magnet to adhere to any metallic surface with a pull of approximately eight pounds.
To protect the vehicle and electronics, NMO mounts are well waterproofed. Most have at least two waterproof seals to prevent the introduction of corrosion and rust to the vehicle and the mount. One seal sits directly against the metal surface used, while the second gasket sits inside the antenna, keeping the antenna connection free from moisture and dirt.
Types of NMO mount
[A] Through-hole NMO mounts
Through-hole or “thru-hole” NMO mounts are one of the most common types of NMO mounts. They are the best choice for an antenna installation that has to withstand rugged use.
Through-hole NMO mounts are for long-term or permanent installation on a vehicle. Holes are drilled through the vehicle roof, bonnet, or trunk, through which the NMO mount is passed. The antenna can then be securely screwed onto the exposed contact on the surface of the vehicle.
Through-hole NMO mount sizes
These NMO mounts come in two sizes, which are based on the size of the hole that must be drilled through the vehicle roof:
- ⅜ inch through-hole NMO mount
- ¾ inch through-hole NMO mount
Benefits of through-hole NMO mounts
Through-hold mounting offers the following benefits:
- Higher resistance against mechanical stress, vibrations, and shock.
- More secure, more resilient antenna installation.
- High mechanical strength because the mount runs through the roof.
- Fewer drilling holes are required for installation
- The mount is sealed with O-rings on both sides for waterproofing that prevents rust from spreading through the metal mounting surface of the vehicle.
Through-hole NMO mount specifications
Through-hole NMO mounts commonly have an all-brass (78 Rockwell Hardness) or chrome body with a gold-plated contact. This ensures corrosion resistance and efficient power transfer so that the antenna performs well. The ground lug is silver-soldered, eliminating static and radio frequency noise. The threading of the outside ring of the NMO connector has a threaded size and pitch of 1 1/8” x 18.
[B] Magnetic NMO mounts
Magnetic NMO mounts are the next major class of NMO mounts. They use a powerful magnet to strongly attach the NMO mount to the vehicle roof or trunk. They can be attached confidently to any vehicle with a metal roof and work with all types of antennas that have NMO mounting requirements. The mag mount comes with a length of suitable coaxial cable attached, which may be terminated with a connector.
Mag mounts offer secure but temporary mounting on any vehicle with a suitable metal surface. Unlike through-hole antennas, the mobile antenna mounting remains easily removable.
The magnets used in mag mounts.
Magnetic NMO mounts use two types of ultra-strong magnets to achieve their hold:
- Neodymium magnets are a type of rare-earth magnet, made from alloyed neodymium, iron, and boron. It was created by the auto industry and is the strongest type of permanent magnet available.
- Ferrite magnets are made from a ceramic material that combines iron(III) oxide, strontium, barium, manganese, nickel, and zinc. The material is not usually electrically conductive but is strongly magnetic. It clamps directly onto any ferromagnetic surface, like steel such as mild steel.
Mag mount performance
The performance of mag mount NMOs is affected by the ability of a mag mount to form a ground plane surface at a proper resonant distance with a DC ground. With magnetic NMO mounts the base of the antenna is above the ground plane surface so the resonant length of the antenna may be off. The antenna also lacks a DC ground connected to the metal of the vehicle body because paint and finishes are in the way.
So amateur radio enthusiasts get around this problem by cutting the antenna to a resonant length (compensating for additional height) for the lowest possible SWR then placing the antenna on a mag mount where the SWR will be higher. Magnetic mounts usually perform best at higher frequencies (UHF versus VHF).
Though the placement of a mag mount is temporary, the mount can damage vehicle paint.
[C] Mirror NMO mounts
Mirror mounts are NMO mounts that can be attached to the side mirror of a semi truck, tractor-trailer, or even the rails and roof racks of a car. It is extremely versatile and a popular alternative to roof or trunk mounting and NMO antenna.
The mirror bracket mount is usually made from chrome or stainless steel with the 1-1/8-18 pitch thread that is common to NMO mounts. The brackets vary in complexity, from basic L-shaped brackets with a hole that a thru-hole NMO mount can be inserted into, to full NMO mounts equipped with coax cables and connectors
[D] Thick NMO mounts
A standard NMO mount is designed to go through surfaces that have a maximum thickness of 2.5 mm, in line with the original Motorola specification. Thick NMO mounts are specifically designed to provide through-hole mounting through much thicker materials. They offer the secure and rugged mounting of a thru-hole NMO mount on vehicles with thick metal surfaces like construction vehicles.
Thick NMO mounts can be used on ¾ or ⅜ inch holes. They are full-adjustable and suitable for surfaces with a thickness of ⅛ or ½ inch.
Typical specifications and features of a thick NMO mount include:
- A precision 50-ohm interface for the antenna and connector
- Low-loss cable and connector pre-installed
- Brass and stainless steel construction; strong and corrosion resistant
- Self-adjusting locking nut to speed up installation
- Heavy-duty, non-rotational centering washer
- Non-slip clamping pressure
[E] Trunk Lip Mount NMO mounts
Though mobile antennas perform best mounted on the roof of a vehicle or trunk deck as described above, a trunk lip mount or lip mount provides a convenient and non-permanent alternative for locating an antenna. Trunk lip mounts are designed only for trunk lip use and are often used with VHF and UHF antennas. They come with coax and can be adjusted to compensate for the angle of the trunk, up to a 17 degree angle. Trunk lip mounts are designed to fit over an edge of 1/4” thick.
The mount is attached to the trunk lid by being slipped over the edge then tightening the set screws that ground the antenna. The screws need to penetrate the metal and so can damage paintwork.
There are also universal lip mounts can be used on almost any lip on a vehicle. They can be positioned in any position from horizontal to vertical. These mounts are adjustable in several planes so that the antenna can be upright in virtually any angle. Universal lip mounts are available with or without an attached coaxial cable.
Benefits of using a trunk lip mount NMO mount
- This mount does not need holes to be drilled
- Installation is quick
- The mount is fully and conveniently removable
- Many vehicle owners prefer the appearance as the difference in signal quality and coverage is negligible compared to a roof mount.
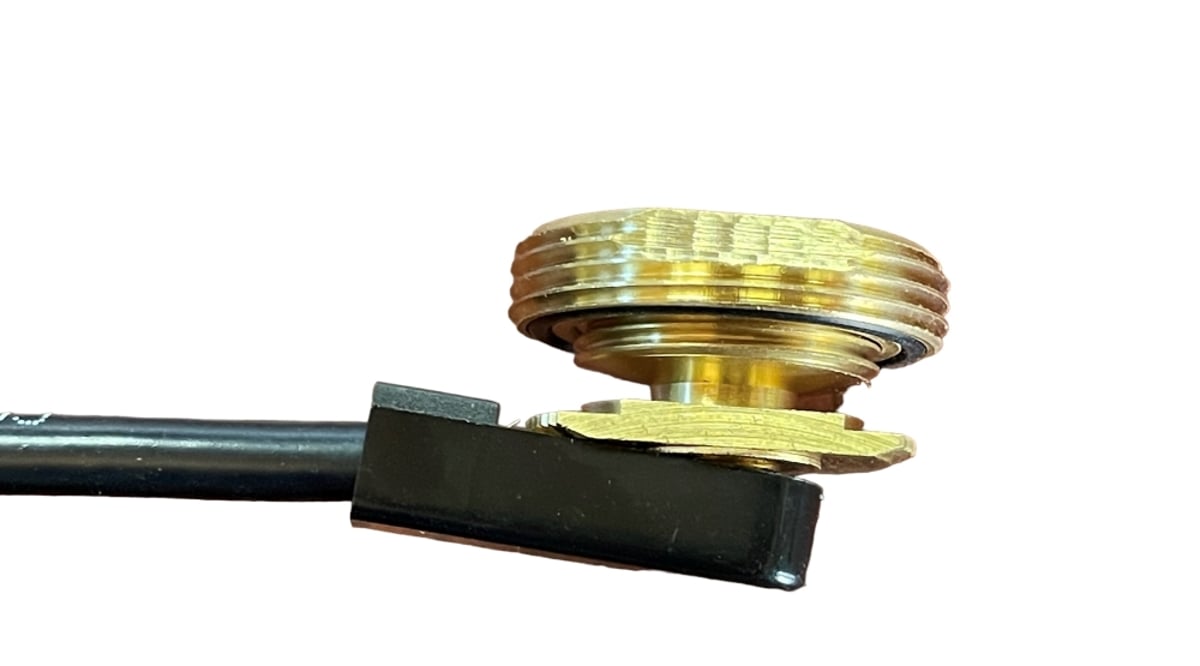
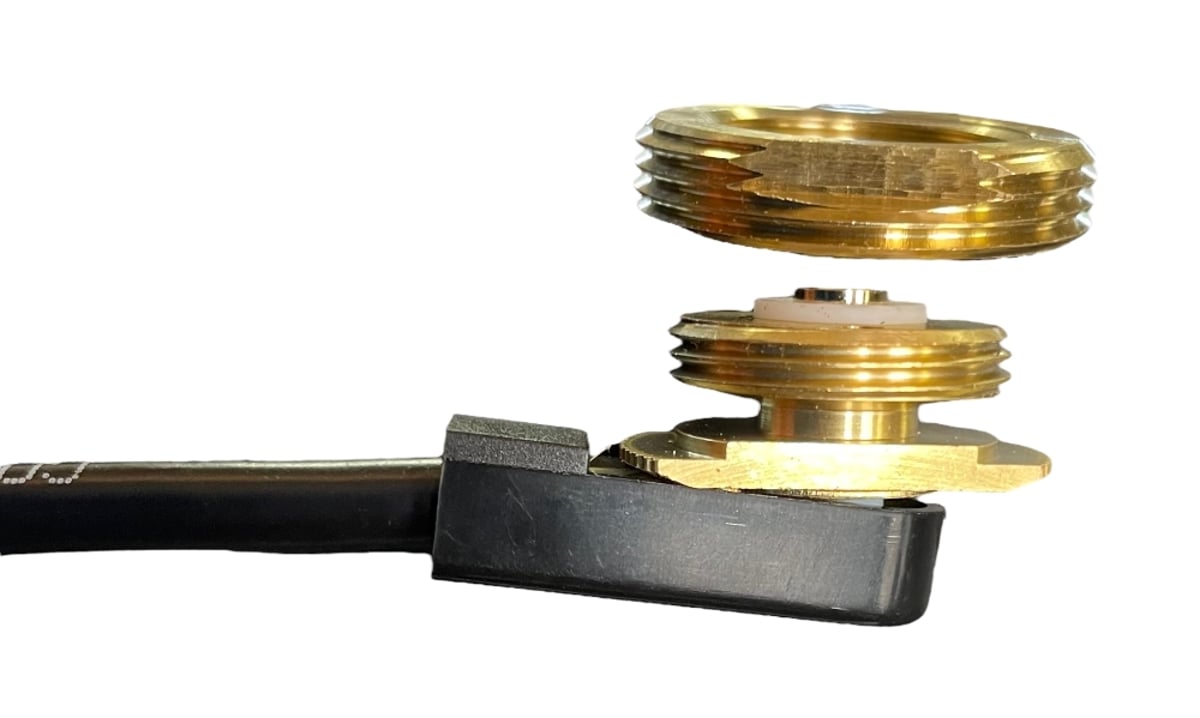
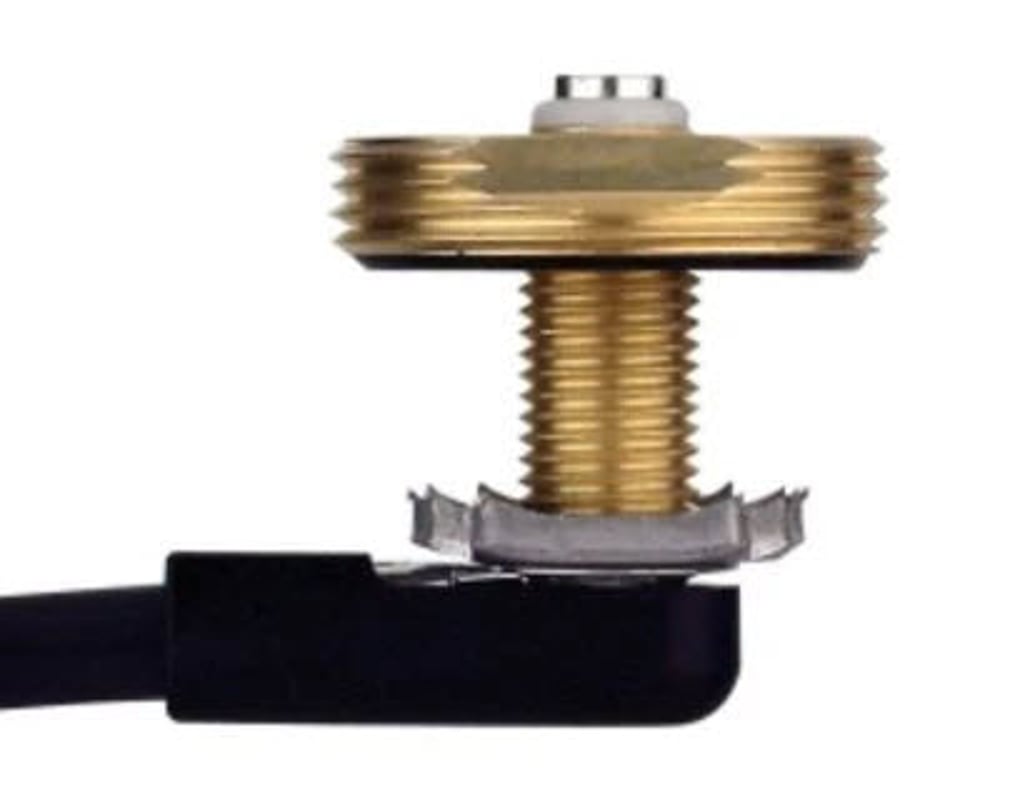
NMO Extended Type for Thick Roofs
 |
 |
 |
Data Alliance can customize the NMO screw to be longer: For example: For vehicles with particularly thick roofs, such as fire trucks and buses.
NMO Antenna Mount Cables
NMO antenna mounts can be supplied with or without cables and radio frequency connectors. These are the most common cable types used with NMO mounts. High quality, flexible coaxial cable with low loss due to double shielding is the best quality cable for these mounts:
The cable can also be assembled with these common classes of radio frequency connector t suit VHF, UHF and microwave applications as required:
- Type N connector
- SMA connector
- RP SMA connector
- TNC connector
- BNC connector
- Mini UHF connector
- PL 259 connector
NMO Compatible Antennas
NMO antennas are base loaded mobile antennas. This means that part of the whip antenna is coiled into a helix which sits above the vehicle when it is mounted correctly. The base-loading limits the effective mounting positions, making an NMO advantageous for secure, erect positioning.
This is a resilient design that is not easily damaged by impacts or shocks. It also has exemplify power handling.
Types of NMO antenna
(i) VHF NMO antennas
Frequency range: 136-174 MHz
These NMO antennas are outdoor omnidirectional antennas that can achieve their maximum range with minimal obstructions. They are often used for two-way radio.
(ii) UHF NMO antennas
Frequency range: 403-470 MHz
These NMO antennas cope better with obstructions and may be used for two-way radio in urban environments.
(iii) Ham radio antennas
Frequency range: 1.4 MHz - 440 MHz
This is a popular frequency range for Ham radio applications, discussed below.
(iii) Multi-band radio antennas
Frequency range:
These NMO antennas are commonly used by law enforcement and other public services for communication and data exchange.
Applications of NMO antennas
Public Safety Communications
These antennas are routinely mounted on public safety vehicle due to their ruggedness and practicality. The antennas attached can support cellular, WiFi, GPS and Bluetooth data exchange. The mounts are fitted to the following vehicles:
- Law enforcement vehicles
- Emergency medical vehicles
- Fire trucks
Ham radio
NMO mounts and antennas are popular with Ham radio enthusiasts because of their mobility and the ease with which antennas can be switched to change frequencies for 2-way radio communications while the vehicle is driven to find the best reception.
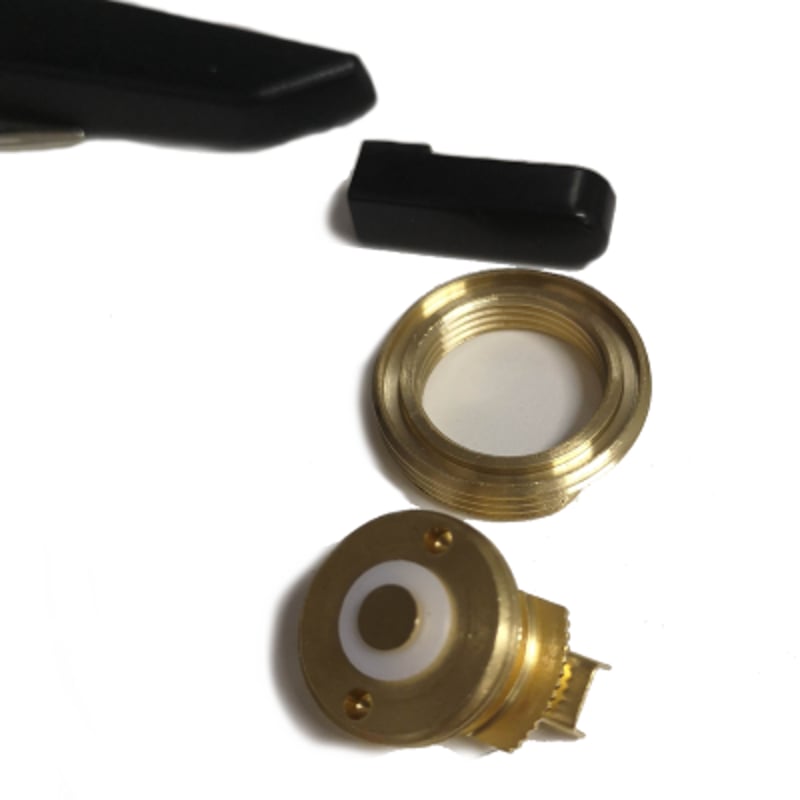
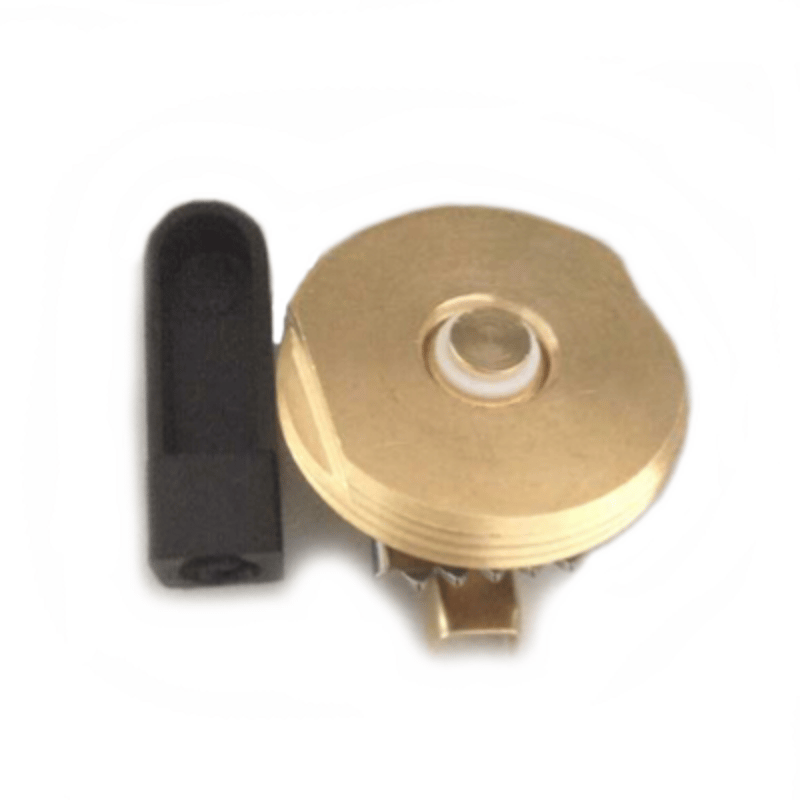
Assembling and installing an NMO mounting kit
The typical components of an NMO mounting kit are:
- Cap
- Body
- Ferrule
- O-ring
- Externally threaded nut
- Locking nut
- Cap insulator
Connecting coaxial cable to an NMO connector
- The first step is to assemble the mount with suitable coax. The process is similar to terminating a length of coax with a radio frequency connector.
- Strip the coax according to the stripping dimensions specified by the NMO manufacturer. The inner conductor, insulator, and braid shield of the coax should be exposed in layers.
- The ferrule of the NMO should be slid over the stripped coax. The braid layer of the coax can then be fanned out away from the insulator.
- The connector body is threaded on under the braid foil (directly over the insulator).
- The center conductor should be positioned halfway within the body of the NMO mount, not passing its center. Once properly positioned the ferrule can be crimped with a hexagonal crimping tool.
- The center conductor of the coax can then be soldered to the center conductor of the NMO connector.
- Replace the metal cap over the center conductor. This needs to be compressed into place. Use a C-clamp and ball bearing to press the metal cap into place until it becomes concave.
Installing a ¾ inch permanent NMO mount
- For permanent installation, standard NMO mounts require a ¾ inch (19mm) hole in the roof of the vehicle. This hole can be made with a hole saw of the right diameter.
- Sand the edges of the hole to remove any burrs that could damage the cable when it is passed through the hole.
- The coax and NMO should be fed through the hole from above. Part of the mounting assembly should also protrude through the hole. Screw the locking nut onto the mounting assembly to complete this more easily.
- The NMO mount can be adjusted into position holding the attached locking nut. The mount will slip into its correct position in the ¾ inch hole. Once in position, pull up on the locking nut while tightening it. The O-ring beneath the locking nut should be properly seated and compressed.
- The locking nut can be further tightened using a spanner wrench or long nose pliers to hold the mounting assembly and an adjustable wrench on the locking
- Nut to 60 in-lb. max (8\6.8 Nm).
Mounting an NMO Trunk Lip Mount (TLM)
- NMO Trunk Lip Mounts are seated on the edge of a trunk.
- The first step is to fit two #10 screws to the TLM using an Allen wrench.
- The TLP may need to be mounted along the side of the trunk lid or the hood of the vehicle but in older vehicles, it is usually mounted on the lip of the trunk lid near the vehicle's rear window.
- The TLP is mounted on the paired set screws. The screw should be tightened enough to penetrate the paint of the vehicle and establish a ground connection on the trunk lid's metal.
- The coaxial cable should be routed from the trunk area to the radio. The connector can then be installed so that the antenna cable can be connected to the radio. The antenna can then be attached to the TLP mount.
Mounting an NMO Trunk Mount Bracket (TLB)
- NMO Trunk Mount Brackets can be attached to the trunk or fender to mount an NMO kit. These simple L-shaped brackets are made from conductive bright stainless steel. They are durable and provide a good grounding for a variety of automotive mounting. Many designs can accommodate a gasket for additional weatherproofing.
- The installation of the stainless steel “L” bracket is straightforward.
- Simply position the TLB on the inside of the trunk gutter or engine hood.
- Drill three holes for screws.
- Secure the TLB with three stainless steel self-tapping screws.
- The coaxial cable can now be routed from the trunk to the radio where the connector can be installed. The antenna cable can then be connected to the radio.
Protecting your NMO mount
NMO mounts should not be left exposed to external conditions when they aren't in use. Without an antenna, NMO mounts are not water-resistant. The NMO mount can be protected from rain and debris by an NMO rain cap. This heavy-duty plastic or vinyl cap protects the exposed mount when the antenna is removed. These are usually made as a universal design. Use the NMO rain cap for outside vehicle storage or any other circumstance where the antenna is not being used as it increases the longevity of the mount. Alternatively, leave the antenna bases attached to the NMO mount.
NMO antenna mounts FAQs
Where should mobile antennas be mounted on vehicles?
NMO antennas require a ground plane. This is the key determinant of antenna location on the vehicle and its performance. The ground plane dimensions required vary by the type and frequency of the mobile antenna. For example, a 5/8 wave antenna that operates at 150 MHz needs a 42-inch diameter ground plane. The ground plane diameter reduces as the frequency of the antenna increases; at 800 MHz an 8-inch ground plane is adequate.
Key locations for mounting a vehicle antenna:
- The roof - this is the optimum location for location a mobile antenna.
- Trunk - this is good location for placing antenna, ideally the center of the trunk lid.
- Front fender
- Rear fender
- Mirrors
- Rear window
The best positions have a good amount of ground plane and clearance from obstruction. Of, course a soft-top roof or plastic shell will not be suitable as the mounting material is not conducive.
What is a ground plane?
A ground plane is a metal (electrically conducive surface) that sits beneath an antenna. Ground plane-dependent mobile antennas mounted on a vehicle use the metal of the vehicle as a ground plane, to reflect and radiate radio frequency signals.
NMO antennas use the ground plane to perform optimally. Ideally the surface should be as large and as flat as possible. An inadequate ground plane limits the reflection of the sign and the transmission range of the antenna. It can also damage the radio by altering the signal wave ratio causing feedback into the radio attached to the antenna. Antennas that are ground-plane independent do not need a metal surface.
 |
 |
 |
 |
 |