


Antennas, Antenna Cables, Wireless Products: Technical Articles
MHF4 Connector Instructions How To Install on Jack and Remove
Table of Contents
How To Install and Uninstall MHF-4 Connectors on a Board Jack
The process of installing and uninstalling MHF4 connectors on a jack on a printed circuit board (PCB)
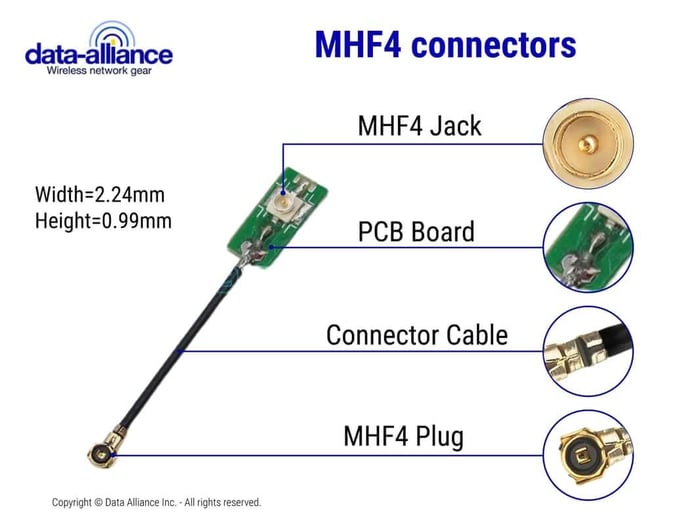
MHF4 connectors are the smallest coaxial connectors available and are often used in on an MHF4 cable in applications like Wi-Fi, Bluetooth, and other RF technologies, particularly where space is at a premium such as in laptops, mobile devices, and IoT gadgets.
Installing MHF4 Connectors
Tools and Materials Needed:
- MHF4 Connector
- MHF4 Cable (Compatible with your device)
- PCB with MHF4 jack
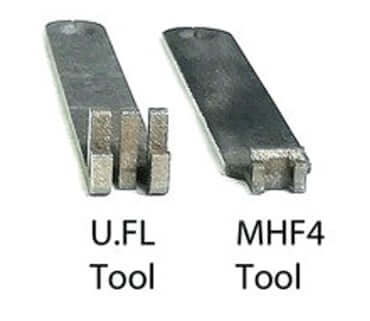
- MHF4 Insertion Tool: Part number MHF4Tool
- Magnification tool (optional)
- Clean, static-free workspace
Step-by-Step Installation:
- Preparation:
- Begin by ensuring you have a clean, static-free work environment to prevent any potential damage to the sensitive electronic components.
- If you're not grounded, consider using an anti-static wrist strap to avoid electrostatic discharge that can ruin the PCB or connector.
- Inspection:
- Inspect the MHF4 connector and the jack on the PCB for any debris or damage. Any imperfections can affect the performance of the connection.
- Alignment:
- Carefully align the MHF4 connector with the jack on the PCB. MHF4 connectors are tiny, so you might need a magnification tool to see that the alignment is precise.
- Connection:
- Using fine-tipped tweezers, hold the MHF4 connector by its sides. Avoid touching the pin or the inner components of the connector.
- Gently place the connector onto the jack. There should be a guide on the jack that helps with the placement.
- Apply slight downward pressure until you feel a click, which indicates that the connector is locked in place.
- Do a gentle pull test to ensure the connector is securely attached. Be careful not to apply too much force.
- Final Check:
- Give your work a once-over to make sure everything is in order and that the connector isn't tilted or off-axis.
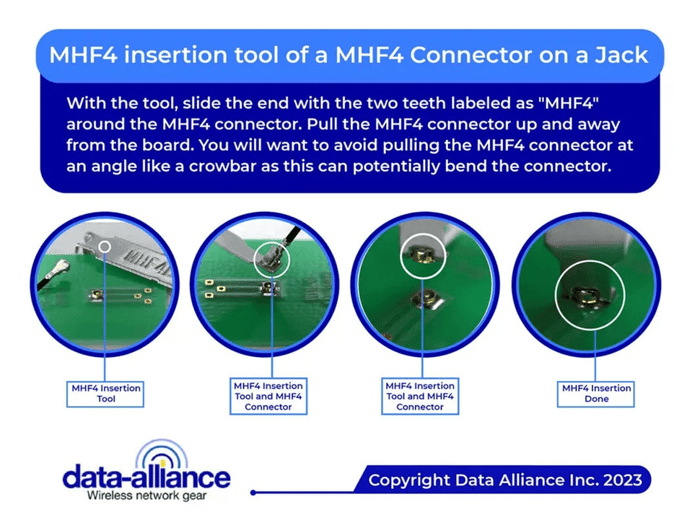
Uninstalling MHF4 Connectors
Tools and Materials Needed:
- MHF4 Push/Pull Tool: Part number MHF4Tool
- Magnification tool (optional)
Step-by-Step Uninstallation:
- Preparation:
- Just like installation, ensure you are working in a clean, static-free environment.
- Ground yourself to prevent any static damage to the electronics.
- Disconnecting:
- Carefully slide the fine-tipped tweezers under the connector. Be gentle to avoid scratching the PCB or damaging the jack.
- Apply an even upward pressure to disengage the connector. There may be a slight resistance as you do this because of the locking mechanism.
- Inspection:
- Once removed, inspect both the connector and the jack for any signs of wear or damage. This is important for troubleshooting any issues and for ensuring a good connection when you reinstall.
- Storage:
- If you plan to reuse the MHF4 connector, store it in a static-free environment. A small, antistatic bag is ideal.
Tips and Considerations:
- Connector Orientation: Pay close attention to the orientation of the MHF4 connector. They are not always symmetrical, and forcing them in the wrong orientation can cause damage.
- Gentle Pressure: Do not use tools to apply pressure when installing the connector. This should be done with your fingers to feel the click.
- Patience is Key: Due to their size, installing and uninstalling MHF4 connectors requires patience and a steady hand. Rushing the process can lead to bent pins or damaged connectors.
- Connector Life Cycle: These connectors are rated for a limited number of mating cycles. Each installation and uninstallation can wear the connector, so limit the frequency of this activity.
- Connector Compatibility and Interconnections Between Different Connectors: While the MHF4 connector is commonly used, various other types of coaxial connectors exist in the world of electronics, each with its own advantages and applications. However, it's crucial to note that MHF4 connectors are not directly compatible with other connector types like SMA, RP-SMA, or U.FL. Forcing incompatible connectors together can damage both the connector and the device, leading to malfunction or poor signal performance. If you need to connect an MHF4 connector to a device with a different connector type, you'll need to use a cable adapter specifically designed for that purpose. These adapters bridge the gap between different connector types, allowing you to connect devices that wouldn't be compatible otherwise.
Here are some examples of commonly used adapters involving MHF4 connectors:
MHF4 to SMA: This adapter allows you to connect an MHF4 cable to a device with an SMA connector.
MHF4 to RP-SMA: This adapter allows you to connect an MHF4 cable to a device with an RP-SMA connector.
MHF4 to U.FL: This adapter allows you to connect an MHF4 cable to a device with a U.FL connector.
By following these steps, you can successfully install and uninstall MHF4 connectors on a PCB jack with confidence. Remember, working with PCBs and RF connectors requires precision and care to maintain the integrity and functionality of the electronic components.
Conclusion: Installing and Uninstalling MHF4 Connectors
Installing and uninstalling MHF4 connectors requires precision, patience, and a clean, static-free environment to protect sensitive PCB components. These ultra-compact connectors are ideal for Wi-Fi, Bluetooth, and IoT applications, where space is limited.
By carefully aligning and securing the connector using light, even pressure—and removing it gently with the proper tool—you ensure reliable RF performance and avoid damage to both the connector and the board. Always verify connector orientation, handle with care, and use compatible adapters when connecting to other interface types like SMA, RP-SMA, or U.FL. Proper technique preserves the connector’s integrity and extends its service life.
FAQs
What are MHF4 connectors used for?
MHF4 connectors are ultra-small coaxial connectors commonly used in Wi-Fi, Bluetooth, and IoT applications where space is limited—such as in laptops, smartphones, and compact electronic devices.
What tools are needed to install an MHF4 connector on a PCB?
You’ll need an MHF4 connector, a compatible cable, a PCB with MHF4 jack, and an MHF4 insertion tool (Part No. MHF4Tool). Optional tools include a magnifier and an anti-static wrist strap to prevent electrostatic damage.
How do I properly install an MHF4 connector?
Align the MHF4 connector with the jack carefully using tweezers, then apply gentle downward pressure until you hear or feel a click. Avoid using excessive force or tools for pressing—it should lock in place by touch alone.
How can I safely uninstall an MHF4 connector?
Use an MHF4 push/pull tool or fine-tipped tweezers to lift the connector gently from underneath. Apply even upward pressure to disengage it, taking care not to scratch the PCB or damage the jack.
How can I prevent damage during installation or removal?
Always work in a clean, static-free workspace, handle connectors by their sides, and never force connections. Using patience and proper tools ensures the tiny pins and contacts remain undamaged.
Are MHF4 connectors compatible with other connector types like SMA or U.FL?
No. MHF4 connectors are not directly compatible with SMA, RP-SMA, or U.FL connectors. To connect them, you must use a dedicated adapter, such as MHF4-to-SMA, MHF4-to-RP-SMA, or MHF4-to-U.FL.
How long do MHF4 connectors last?
MHF4 connectors have a limited mating cycle life, meaning each installation and removal causes some wear. To extend their lifespan, minimize reconnections and handle them gently.