Antennas, Antenna Cables, Wireless Products: Technical Articles
MHF4 Connector Instructions How To Install on Jack and Remove
Table of Contents
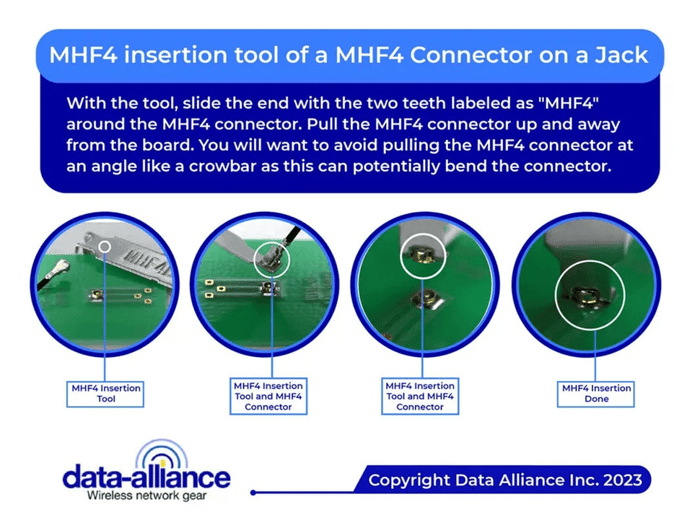
How To Install and Uninstall MHF-4 Connectors on a Board Jack
The process of installing and uninstalling MHF4 connectors on a printed circuit board (PCB) jack requires precision, proper tools, and a clear understanding of RF connector handling. At Data Alliance, we specialize in IoT wireless antenna systems and RF connectivity solutions, where MHF4 connectors play a critical role in compact, high-performance designs.
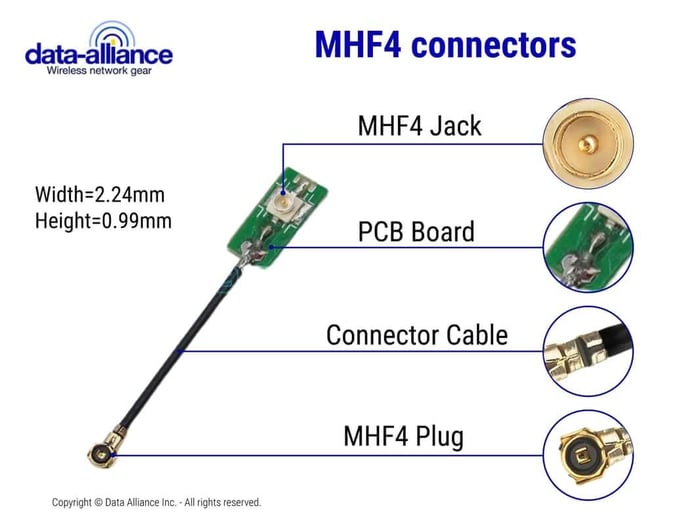
MHF4 connectors are among the smallest RF coaxial connectors available and are widely used in space-constrained applications such as Wi-Fi modules, Bluetooth devices, embedded IoT systems, cellular modules (LTE/5G), and compact computing platforms like laptops and industrial gateways. Due to their miniature size and delicate construction, proper installation and removal techniques are essential to maintain signal integrity and avoid damage.
Installing MHF4 Connectors
Tools and Materials Needed:
- MHF4 Connector
- MHF4 Cable (compatible with your RF module or device)
- PCB with MHF4 jack (board-mounted receptacle)
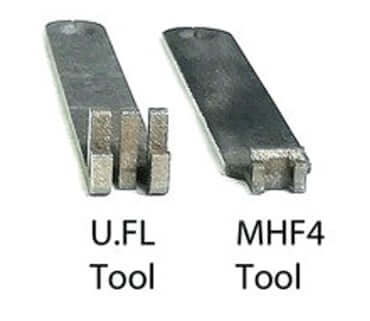
- MHF4 Insertion Tool (Recommended: Part number MHF4Tool)
- Fine-tipped ESD-safe tweezers
- Magnification tool (recommended for precision work)
- Clean, static-free workspace (ESD-safe mat preferred)
Step-by-Step Installation:
Preparation:
Begin by setting up a clean, organized, and static-free workspace. MHF4 connectors are extremely small and sensitive to electrostatic discharge (ESD), which can damage both the connector and the PCB circuitry.
Use an anti-static wrist strap and ESD mat whenever possible. This is especially important in professional IoT and RF assembly environments where reliability is critical.
Inspection:
Carefully inspect both the MHF4 connector and the PCB jack under magnification. Look for:
- Dust or debris
- Bent or misaligned center contacts
- Damage to the outer shell
Even minor contamination can degrade RF performance, causing signal loss or intermittent connectivity.
Alignment:
Proper alignment is the most critical step. The MHF4 connector must be perfectly centered over the PCB jack before applying any pressure.
Because of the small size, use a magnification tool to confirm alignment. The connector should sit evenly on top of the jack without tilting.
Connection:
Using fine-tipped tweezers, gently hold the connector by its outer edges. Avoid touching the center pin or dielectric.
Place the connector directly onto the jack and apply light, even downward pressure. Ideally, use a proper MHF4 insertion tool (MHF4Tool) for consistent and safe pressure distribution.
You should feel or hear a subtle “click” indicating the connector has snapped into place.
Verification:
Perform a gentle pull test by lightly tugging the cable. The connector should remain securely attached without movement.
Visually confirm that the connector is seated flat and not angled. Misalignment can lead to poor RF performance or eventual connector failure.
Final Check:
Inspect the installation one more time under magnification. Ensure:
- Connector is fully seated
- No visible gaps between connector and jack
- Cable strain is minimal and properly routed
Uninstalling MHF4 Connectors
Tools and Materials Needed:
- MHF4 Push/Pull Tool: Part number MHF4Tool
- Magnification tool (optional)
Step-by-Step Uninstallation:
- Preparation:
- Just like installation, ensure you are working in a clean, static-free environment.
- Ground yourself to prevent any static damage to the electronics.
- Disconnecting:
- Carefully slide the fine-tipped tweezers under the connector. Be gentle to avoid scratching the PCB or damaging the jack.
- Apply an even upward pressure to disengage the connector. There may be a slight resistance as you do this because of the locking mechanism.
- Inspection:
- Once removed, inspect both the connector and the jack for any signs of wear or damage. This is important for troubleshooting any issues and for ensuring a good connection when you reinstall.
- Storage:
- If you plan to reuse the MHF4 connector, store it in a static-free environment. A small, antistatic bag is ideal.
Tips and Considerations
Connector Orientation:
MHF4 connectors are not always symmetrical. Incorrect orientation can prevent proper seating or cause permanent damage. Always verify alignment before applying pressure.
Use Proper Tools:
While tweezers can work, Data Alliance strongly recommends using a dedicated MHF4Tool for both installation and removal. This ensures consistent force and reduces risk.
Gentle Pressure Only:
Never use excessive force. If the connector does not snap easily into place, it is likely misaligned.
Patience and Precision:
Due to their miniature size, MHF4 connectors require a steady hand and attention to detail. Rushing increases the risk of bent contacts or damaged PCB jacks.
Connector Life Cycle:
MHF4 connectors are typically rated for a limited number of mating cycles (often 30–50 cycles depending on manufacturer). Minimize repeated connections and disconnections to extend lifespan.
Cable Strain Relief:
Ensure the cable is routed without tension or sharp bends. Excess strain can weaken the connector interface over time and degrade RF performance.
Connector Compatibility and RF Integration
MHF4 connectors are widely used in modern IoT and wireless systems, but they are not directly compatible with larger RF connector types such as:
- SMA
- RP-SMA
- U.FL (different size and mating interface)
Attempting to connect incompatible connectors will result in damage and poor signal performance.
Using Adapters
To integrate MHF4-based devices into broader RF systems, use properly designed adapter cables. Data Alliance offers a range of high-quality RF adapter solutions for seamless integration.
Common Adapter Types:
- MHF4 to SMA
Ideal for connecting compact IoT modules to external antennas with SMA connectors. - MHF4 to RP-SMA
Common in Wi-Fi applications where RP-SMA antennas are used. - MHF4 to U.FL
Useful for bridging between different miniature connector standards in embedded systems.
These adapters maintain impedance matching (typically 50 ohms), which is critical for minimizing signal loss in RF systems.
By following these steps, you can successfully install and uninstall MHF4 connectors on a PCB jack with confidence. Remember, working with PCBs and RF connectors requires precision and care to maintain the integrity and functionality of the electronic components.
Data Alliance Application Insight
In Data Alliance IoT antenna systems, MHF4 connectors are commonly used in:
- Cellular (LTE / 5G) modules
- Embedded IoT gateways
- Compact antenna integration inside enclosures
- Wireless sensor networks
Proper installation ensures optimal signal transmission, reduced interference, and long-term reliability in demanding environments.
Conclusion: Installing and Uninstalling MHF4 Connectors
Installing and uninstalling MHF4 connectors requires precision, patience, and adherence to proper RF handling practices. These ultra-compact connectors are essential in modern wireless technologies, especially in IoT, Wi-Fi, and cellular applications where space and performance are critical.
By carefully aligning the connector, using proper tools like the MHF4Tool, and applying light, even pressure, you can ensure a secure and reliable connection. When removing connectors, always use controlled force and avoid pulling on the cable to prevent damage.
Always verify connector orientation, maintain a clean ESD-safe environment, and use compatible adapters when interfacing with SMA, RP-SMA, or U.FL systems. Following these best practices will preserve connector integrity, maintain signal performance, and extend the service life of your RF components.
For high-quality MHF4 cables, adapters, and IoT antenna solutions, Data Alliance provides reliable products and technical support tailored to real-world wireless deployments.
FAQs
What are MHF4 connectors used for?
MHF4 connectors are ultra-small coaxial connectors commonly used in Wi-Fi, Bluetooth, and IoT applications where space is limited—such as in laptops, smartphones, and compact electronic devices.
What tools are needed to install an MHF4 connector on a PCB?
You’ll need an MHF4 connector, a compatible cable, a PCB with MHF4 jack, and an MHF4 insertion tool (Part No. MHF4Tool). Optional tools include a magnifier and an anti-static wrist strap to prevent electrostatic damage.
How do I properly install an MHF4 connector?
Align the MHF4 connector with the jack carefully using tweezers, then apply gentle downward pressure until you hear or feel a click. Avoid using excessive force or tools for pressing—it should lock in place by touch alone.
How can I safely uninstall an MHF4 connector?
Use an MHF4 push/pull tool or fine-tipped tweezers to lift the connector gently from underneath. Apply even upward pressure to disengage it, taking care not to scratch the PCB or damage the jack.
How can I prevent damage during installation or removal?
Always work in a clean, static-free workspace, handle connectors by their sides, and never force connections. Using patience and proper tools ensures the tiny pins and contacts remain undamaged.
Are MHF4 connectors compatible with other connector types like SMA or U.FL?
No. MHF4 connectors are not directly compatible with SMA, RP-SMA, or U.FL connectors. To connect them, you must use a dedicated adapter, such as MHF4-to-SMA, MHF4-to-RP-SMA, or MHF4-to-U.FL.
How long do MHF4 connectors last?
MHF4 connectors have a limited mating cycle life, meaning each installation and removal causes some wear. To extend their lifespan, minimize reconnections and handle them gently.